There’s something truly magical about making homemade chocolates for Valentine’s Day. Picture this: the aroma of melting chocolate wafting through your kitchen, a sprinkle of love in every bite, and the thrill of surprising your special someone with a gift made from your own hands. Trust me, there’s nothing quite like it! This recipe for delicious Valentine’s Day chocolates will not only impress your loved ones but also create a lovely experience for you as you melt, mix, and mold your way to chocolate perfection.
What I love most about this recipe is how easy it is to whip up a batch of rich, decadent chocolates that taste like they came straight from a fancy chocolatier. You can customize them however you want—add in some crunchy nuts, or kick things up a notch with a splash of your favorite liqueur. The possibilities are endless! So grab your apron, and let’s get started on making the best homemade chocolates that’ll make this Valentine’s Day one to remember!
Why You’ll Love This Recipe
You’re going to love this recipe for homemade Valentine’s Day chocolates because it’s quick, simple, and oh-so-satisfying! In just about 30 minutes, you can create a batch of chocolates that taste like they were crafted by a professional chocolatier. Plus, the flavor is rich and indulgent thanks to the perfect blend of dark and milk chocolates combined with creamy butter and luscious heavy cream. Trust me, each bite is a little piece of heaven!
But what really sets this recipe apart is the ability to customize it to your heart’s content. Want to add a little crunch? Toss in some chopped nuts or even a sprinkle of sea salt for that sweet-savory balance. Feeling adventurous? Try experimenting with different fillings like caramel or fruit purée! This flexibility means you can tailor your chocolates to suit your loved one’s tastes, making them feel extra special. So, let’s get those creative juices flowing!
Ingredients List
Making these homemade Valentine’s Day chocolates is a breeze, especially with the right ingredients on hand! Here’s what you’ll need:
- 200g dark chocolate: Choose high-quality dark chocolate for a rich flavor that balances beautifully with the sweetness of the milk chocolate.
- 100g milk chocolate: This will add a creamy sweetness that complements the dark chocolate perfectly.
- 50g butter: Unsalted butter is best here, as it enhances the chocolate’s richness without overpowering it.
- 1 cup heavy cream: This will make your chocolates wonderfully smooth and indulgent.
- 1 tsp vanilla extract: A splash of vanilla adds depth and warmth to your chocolate mixture.
- 1/2 cup chopped nuts (optional): Feel free to get creative with your favorites, like almonds or hazelnuts, for added texture.
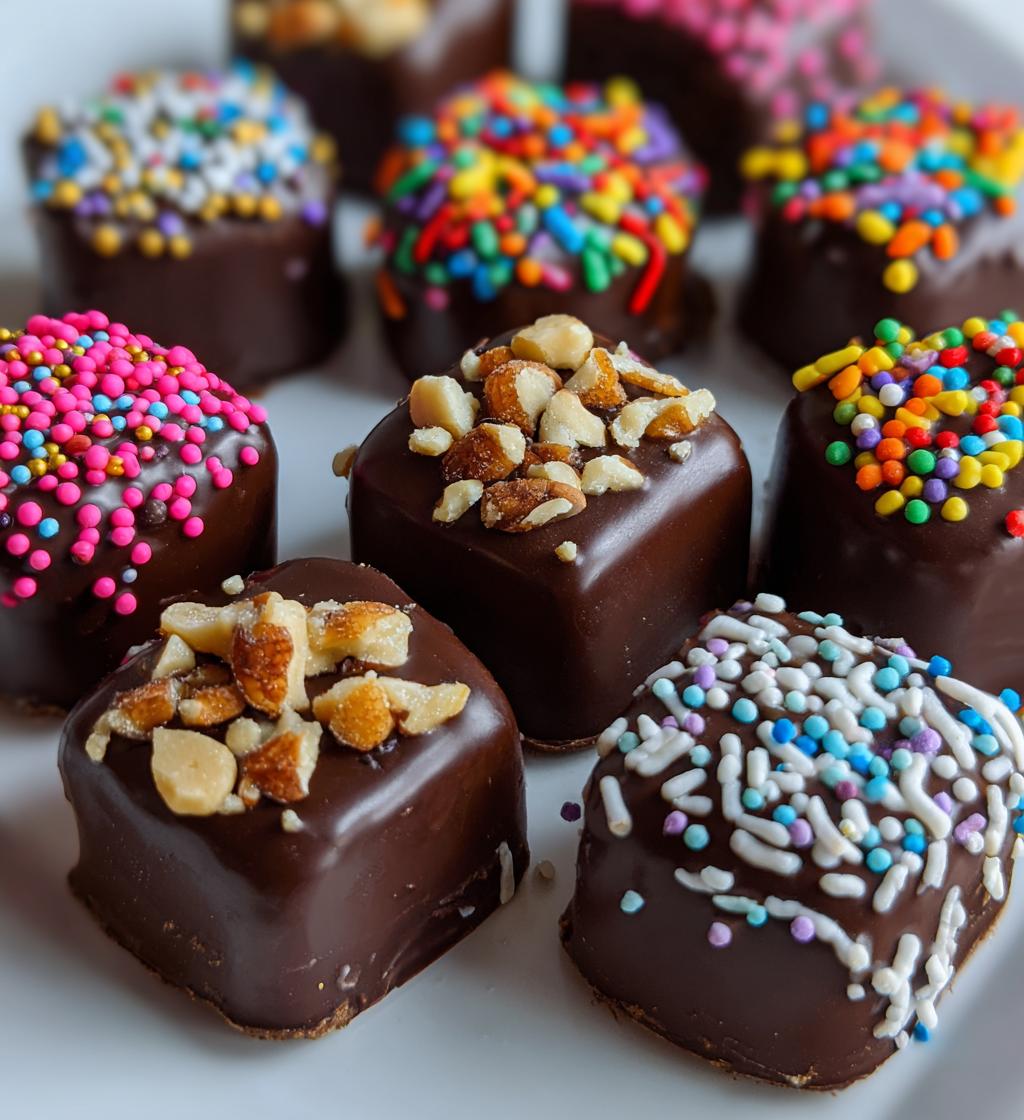
- Sprinkles for decoration: Add a fun touch to your chocolates with colorful sprinkles that scream love!
Gather these ingredients, and you’ll be well on your way to creating something truly special for your loved ones!
How to Prepare Valentine’s Day Chocolates
Now, let’s dive into the fun part—making your own homemade Valentine’s Day chocolates! Follow these simple steps, and I promise you’ll have a delightful treat to share with your loved ones.
Step 1: Chop the Chocolates
First things first, you’ll want to chop your dark and milk chocolate into small, uniform pieces. This is super important because it ensures that the chocolate melts evenly. I like to use a sharp knife and a cutting board for this. Just cut each block into smaller squares, then go back and chop those into even smaller chunks. Aim for pieces about half an inch in size. It makes melting a breeze!
Step 2: Melt the Mixture
Next up, let’s melt that chocolate! Grab a heatproof bowl and set it over a pot of simmering water—this is called a double boiler method. It’s perfect for melting chocolate without burning it. Just make sure the bowl doesn’t touch the water. Toss in your chopped chocolate along with the butter. Stir gently as it melts, keeping an eye on it. This process usually takes about 5-7 minutes. If you see any stubborn bits, don’t rush it; patience is key here!
Step 3: Combine Ingredients
Once everything is beautifully melted and smooth, it’s time to stir in the heavy cream and vanilla extract. This is where the magic happens! Pour in the cream gradually while stirring continuously until the mixture is silky and creamy. You want it to be smooth without any lumps—this is what gives your chocolates that luscious texture you’ll love!
Step 4: Add Optional Ingredients
If you want to amp up your chocolates, now’s the time to add your chopped nuts. I often go for toasted almonds or hazelnuts for that extra crunch! Just fold them in gently to ensure they’re evenly distributed throughout the chocolate mixture. You can also get creative here—try adding a bit of sea salt, or even some dried fruit for a surprising twist!
Step 5: Molding Chocolates
Now it’s time to pour that delicious mixture into your chocolate molds. Make sure the molds are clean and dry! I like to use a small ladle for this part, but you can also use a piping bag for more precision. Fill each mold to the top, but don’t overflow—keep it neat! This step is crucial because it shapes your chocolates and makes them look lovely.
Step 6: Cooling Process
Once you’ve filled your molds, pop them in the refrigerator for at least 2 hours. This is when the magic happens, and your chocolates firm up beautifully. I know it’s hard to wait, but trust me, it’s worth it! You’ll want them to be completely set before you attempt to remove them.
Step 7: Decorating Your Chocolates
Finally, it’s time for the fun part—decorating! Carefully remove your chocolates from the molds. If they’re stubborn, gently twist the mold to help them pop out. Now, grab those sprinkles and go wild! A little sprinkle love on top adds color and makes them look extra festive. You could even drizzle some melted chocolate over them for that fancy touch!
And there you have it—homemade Valentine’s Day chocolates that are sure to impress! Enjoy making these with love, and don’t forget to taste the deliciousness along the way!
Tips for Success
Let me share some of my favorite tips to ensure your homemade Valentine’s Day chocolates turn out perfectly every time! First, always use high-quality chocolate. Trust me, it makes a world of difference in flavor and texture. Look for chocolate that has at least 60% cocoa content for that rich taste.
Also, when melting your chocolate, make sure to stir gently and avoid any moisture getting into the bowl. Water and chocolate are a bad combo and can cause your chocolate to seize up. Patience is key here—don’t rush the melting process!
Lastly, if you’re feeling adventurous, try adding a dash of espresso powder or a splash of your favorite liqueur to the chocolate mixture for an extra layer of flavor. And remember, have fun with the decorating—you can never go overboard with love and sprinkles!
Variations
One of the best parts about making homemade Valentine’s Day chocolates is the endless possibilities for customizing them! If you’re looking to switch things up, consider adding different fillings to surprise your loved ones. How about a luscious caramel center? Just melt some caramel candies and spoon a small amount into the molds before adding the chocolate mixture on top. It adds a delightful gooeyness!
Another fun option is incorporating fruit flavors. You can mix in some fruit purée, like raspberry or orange, for a refreshing twist. Just be sure to reduce the heavy cream slightly to maintain the right consistency. If you’re feeling adventurous, try adding a hint of spice—think chili powder or cinnamon—for a unique flavor kick!
With these variations, you’ll truly make your chocolates special and memorable. Just remember to taste as you go, and let your creativity shine through!
Storage & Reheating Instructions
Storing your homemade Valentine’s Day chocolates properly ensures they stay fresh and delicious! After your chocolates have set and you’ve finished decorating them, place any leftovers in an airtight container. You can keep them at room temperature for up to a week, but if your home is warm, I’d recommend refrigerating them to maintain their texture.
If you need to reheat them—perhaps for melting down and reshaping—do so gently. Place the chocolates in a heatproof bowl over simmering water, just like you did for melting initially. Stir until they’re smooth and silky again. Just remember, don’t overheat, or you might end up with a seized mess! Enjoy your delightful creations whenever you’re in the mood for a sweet treat!
Nutritional Information
Here’s a quick look at the estimated nutritional data for these delicious homemade Valentine’s Day chocolates. Each serving, which consists of about two chocolates, contains approximately 150 calories. You’ll also find about 10g of sugar, 10g of fat (with 6g being saturated fat), and 2g of protein. Keep in mind that these values can vary slightly based on the exact ingredients you use. It’s a sweet treat, so enjoy them in moderation, and feel free to share the love!
FAQ Section
Got questions about making these delightful homemade Valentine’s Day chocolates? Don’t worry; I’ve got you covered! Here are some common queries I hear, and trust me, you’re not alone in wondering these things.
Can I use different types of chocolate? Absolutely! While this recipe calls for dark and milk chocolate, you can mix it up with white chocolate or even flavored chocolates. Just remember that the melting point may vary slightly, so keep an eye on it!
What if I don’t have chocolate molds? No problem! You can use a lined muffin tin or even small paper cups to create your chocolates. Just make sure to adjust the cooling time, as smaller molds will set faster.
How can I make my chocolates more festive? Get creative with your decorations! You can use colored sprinkles, drizzle melted chocolate in contrasting colors, or even add edible glitter for that extra sparkle. It’s all about making them look as good as they taste!
Do these chocolates need to be refrigerated? Yes, I recommend keeping them in the fridge if you want to maintain their shape and texture, especially if it’s warm in your kitchen. They’ll stay fresh for about a week, but trust me, they won’t last that long!
Feel free to reach out if you have more questions—I’m here to help you make this Valentine’s Day extra sweet!
Print
valentines day chocolates: 7 Steps to Sweet Perfection
- Total Time: 2 hours 30 minutes
- Yield: 12 chocolates 1x
- Diet: Vegetarian
Description
Delicious homemade chocolates for Valentine’s Day.
Ingredients
- 200g dark chocolate
- 100g milk chocolate
- 50g butter
- 1 cup heavy cream
- 1 tsp vanilla extract
- 1/2 cup chopped nuts (optional)
- Sprinkles for decoration
Instructions
- Chop the dark and milk chocolate into small pieces.
- Melt the chocolate and butter together in a bowl over simmering water.
- Stir in the heavy cream and vanilla extract until smooth.
- Add chopped nuts if desired.
- Pour the mixture into chocolate molds.
- Refrigerate for at least 2 hours until set.
- Remove chocolates from molds and decorate with sprinkles.
Notes
- Use high-quality chocolate for better taste.
- Experiment with different fillings like fruit or caramel.
- Prep Time: 20 minutes
- Cook Time: 10 minutes
- Category: Dessert
- Method: Melting and molding
- Cuisine: American
Nutrition
- Serving Size: 2 chocolates
- Calories: 150
- Sugar: 10g
- Sodium: 5mg
- Fat: 10g
- Saturated Fat: 6g
- Unsaturated Fat: 4g
- Trans Fat: 0g
- Carbohydrates: 15g
- Fiber: 2g
- Protein: 2g
- Cholesterol: 5mg
Keywords: valentines day chocolates, homemade chocolates, dessert recipes