
bbq stand: Create the Perfect Outdoor Cooking Experience
Are you ready to elevate your outdoor cooking game with an exceptional bbq stand? This essential tool saves time and enhances your grilling experience, making every barbecue a delightful affair. Have you ever wondered how some backyard chefs create those mouthwatering dishes that leave everyone asking for seconds? With the right bbq stand, you can achieve that same level of culinary mastery.
Imagine the aroma of smoky meats wafting through the air as you gather with friends and family around your outdoor space. The vibrant colors of grilled vegetables and the sizzle of meat create an inviting atmosphere that beckons everyone to join in. The tender, juicy bites paired with a crispy exterior will have your taste buds dancing. Not only does a well-constructed bbq stand serve as a functional cooking platform, but it also enhances the entire experience of outdoor grilling.
In this article, we will explore the various health benefits associated with outdoor grilling, the unique features of our recommended bbq stand, and how it can transform your cooking routine. Additionally, you’ll gain insights into the best practices for using your stand effectively, ensuring delicious results every time.
When it comes to outdoor cooking, the benefits of using a bbq stand go beyond just convenience. Grilling is a cooking method that allows excess fat to drip away from your food, resulting in lower calorie meals. This means you can enjoy your favorite grilled foods without the guilt. Grilling also retains nutrients in your ingredients, making it an excellent option for health-conscious individuals.
Moreover, using a bbq stand can promote the inclusion of a variety of food groups in your meals. Grilled vegetables are a delicious way to consume more fiber, vitamins, and minerals. For example, bell peppers are rich in Vitamin C, while zucchini provides Vitamin A and potassium. This combination not only enhances your meals but also supports overall health.
Another health benefit of grilling on a bbq stand is the reduced formation of harmful compounds compared to frying. By cooking at high temperatures and allowing fat to drip away, you minimize the risk of consuming unwanted substances. Plus, grilling encourages you to experiment with different marinades and spices, which can introduce beneficial antioxidants into your diet.
Did you know that grilling can also boost your mood? The act of cooking outdoors has been shown to reduce stress levels and promote relaxation. This is not only due to spending time in nature but also because grilling encourages social interaction and bonding with loved ones. So, not only will you be creating delicious meals, but you’ll also be fostering meaningful connections.
In addition to its health benefits, the bbq stand we recommend is designed for versatility and ease of use. Unlike other stands, this model features adjustable heights and a sturdy frame, allowing you to grill various foods simultaneously. This adaptability makes it perfect for family gatherings, weekend cookouts, or even casual weeknight dinners.
What sets this specific bbq stand apart is its portability. You can easily transport it from your backyard to a park or beach, making it a great companion for outdoor adventures. Its compact design ensures that you won’t have to compromise on space, even in smaller outdoor areas.
This bbq stand has been tried and tested by countless families and home chefs, receiving rave reviews for its ease of use and durability. Whether you’re a beginner trying to master the art of grilling or an experienced chef looking for a reliable cooking platform, this stand has something to offer everyone.
To sum up, the preparation time for setting up and cooking with a bbq stand is minimal, allowing you to enjoy delicious meals without spending hours in the kitchen. This recipe is suitable for all skill levels and is ideal for weeknight dinners, meal prep, or entertaining guests.
What is a BBQ Stand?
A bbq stand is a versatile outdoor cooking tool designed to hold a grill or cooking surface, allowing you to prepare a variety of foods outdoors. It provides a stable and elevated platform, making it easier to cook while enjoying the fresh air and socializing with friends and family.
Why You Will Love This Recipe
- Convenience: Set up your cooking space easily and grill anywhere.
- Healthier Cooking: Enjoy lower-calorie meals with grilled meats and vegetables.
- Versatility: Cook a wide range of dishes, from meats to vegetables.
- Durability: This stand is built to last, ensuring long-term use.
- Social Experience: Gather with friends and family while cooking outdoors.
Ingredients You Need
- Grill – The main component that provides the cooking surface.
- Charcoal or Propane – The fuel source for your grill.
- Marinades and Seasonings – Enhance the flavor of your meats and vegetables.
- Grilling Utensils – Essential tools for handling food safely on the grill.
- Protective Gear – Gloves and an apron to keep you safe and clean.
How to Make BBQ Stand Step by Step
- Choose a flat surface for your bbq stand to ensure stability.
- Set up your grill according to the manufacturer’s instructions.
- Prepare your ingredients by marinating meats and chopping vegetables.
- Preheat your grill, ensuring it reaches the appropriate temperature for cooking.
- Place your food on the grill, making sure not to overcrowd the cooking surface.
- Monitor cooking times and flip your food as necessary for even cooking.
- Once cooked, remove your food from the grill and allow it to rest for a few minutes.
- Serve your delicious grilled meals and enjoy!
Pro Tip: Always preheat your grill for at least 10-15 minutes to achieve better searing and flavor.
Expert Tips for Best Results
- Clean your grill after each use to maintain its longevity and performance.
- Experiment with different wood chips for added flavor in your grilled dishes.
- Use a meat thermometer to ensure your proteins are cooked to safe temperatures.
- Allow meats to marinate for at least 30 minutes for enhanced flavor.
- Let grilled food rest before slicing to retain juices and improve tenderness.
- Keep a spray bottle of water handy to control flare-ups while grilling.
Variations and Substitutions
- Vegetarian BBQ Stand: Use plant-based proteins and a variety of seasonal vegetables.
- Low-Carb Option: Grill meats and non-starchy vegetables for a keto-friendly meal.
- Regional Flavors: Incorporate spices and marinades inspired by different cuisines.
- Seasonal Ingredients: Adjust your menu based on what’s fresh and in season.
How to Serve and Store
Serve your grilled dishes with fresh salads, dips, or sauces to enhance the flavors. Store leftovers in an airtight container in the fridge for up to three days. You can freeze grilled meats for up to three months; reheating is best done in the oven or on the grill to maintain texture.
Frequently Asked Questions
Can you use a BBQ stand on a balcony?
Yes, as long as it complies with your building’s safety regulations.
What types of grills can I use on a BBQ stand?
You can use charcoal, propane, or electric grills, depending on your preference.
How do I clean a BBQ stand?
Use warm soapy water and a non-abrasive sponge to clean the stand after each use.
Is a BBQ stand portable?
Yes, many models are designed for easy transport and setup.
Can I cook indoors with a BBQ stand?
No, BBQ stands are meant for outdoor use due to smoke and safety concerns.
How long does it take to grill food on a BBQ stand?
Cooking times vary by food type; generally, it takes 10-30 minutes to grill.
In conclusion, a bbq stand is an essential tool for anyone looking to enhance their outdoor cooking experience. It offers numerous health benefits and allows you to create delicious meals effortlessly. Try this recipe today and leave a comment below!
Print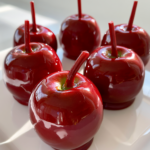
bbq stand: Create the Perfect Outdoor Cooking Experience
Description
This candy apple recipe gives you a perfectly glossy, hard-crack sugar coating that shatters cleanly on the first bite — every single time. Made with just 5 pantry ingredients and ready in 30 minutes, these classic homemade candy apples bring back every carnival and Halloween memory you have. No sticky coating, no cloudy finish, no guesswork — just the real thing, made right in your kitchen. The secret is one number: 300°F. Hit that temperature and you cannot fail.
Ingredients
- 6 medium apples, firm variety — Granny Smith (tart) or Fuji (sweet) strongly recommended
- 2 cups (400g) granulated white sugar
- 1/2 cup (120ml) light corn syrup
- 3/4 cup (180ml) water
- 1/2 teaspoon red gel food coloring (gel gives deeper color than liquid)
- 1/2 teaspoon cinnamon extract or flavoring oil (optional)
- 6 wooden candy apple sticks or sturdy lollipop sticks
- Non-stick cooking spray
- Parchment paper or silicone baking mat
Instructions
- Set up your workspace before you start: line a baking sheet with parchment paper and coat lightly with non-stick cooking spray. Have your sticked apples ready and within reach. Once the sugar reaches temperature, you must move fast — preparation is everything.
- Remove all wax from your apples. Store-bought apples have a food-grade wax coating that will prevent the candy from sticking and cause bubbles. Dip each apple in boiling water for 5 seconds, then scrub dry with a rough kitchen towel. Insert a wooden stick firmly into the stem end of each apple, pushing it at least halfway through. Set aside on your prepared baking sheet.
- In a heavy-bottomed medium saucepan, combine the sugar, corn syrup, and water. Stir gently just until the sugar is moistened. Clip a candy thermometer to the side of the pan, ensuring the tip is submerged in the mixture but not touching the bottom of the pan — an inaccurate reading will ruin the coating.
- Place the saucepan over medium-high heat. Bring the mixture to a full rolling boil without stirring. Once boiling, use a wet pastry brush to wipe down any sugar crystals clinging to the sides of the pan — any crystals that fall back in can cause the whole batch to crystallize.
- Continue boiling, without stirring, until the candy thermometer reads between 300°F and 310°F (149°C–154°C) — this is the hard crack stage. This takes approximately 15 to 20 minutes. The temperature will climb slowly at first, then speed up dramatically near the end. Do not walk away during the last 5 minutes.
- Remove the pan from heat immediately once it hits 300°F. Stir in the gel food coloring and cinnamon extract if using. Do not overstir — a few gentle turns are enough. Now wait. Allow all the bubbles to fully subside, about 1 to 2 minutes. Dipping into a bubbly syrup will leave a textured, uneven coating on your apples.
- Tilt the saucepan to one side so the syrup pools deeply in one corner — this makes full coverage easier. Working one apple at a time, dip and rotate each apple to coat completely, letting the excess drip back into the pan for 3 to 4 seconds. Place each coated apple stick-side up on the prepared baking sheet. Do not touch or move the apples while they set. Allow to cool completely at room temperature for at least 20 minutes before serving. The coating will harden to a glass-like finish.
Notes
- Why is my candy apple coating sticky or chewy? The syrup did not reach 300°F (hard crack stage). Even a few degrees short — at 290°F or 295°F — leaves too much water in the sugar, resulting in a soft, taffy-like texture instead of a hard shell. Always use a calibrated candy thermometer and do not remove from heat early.
- Why is my candy apple coating cloudy or full of bubbles? You dipped before the bubbles fully settled after adding the food coloring. Always wait 1 to 2 full minutes after removing from heat until the surface is completely still and glossy before dipping.
- Why won’t the coating stick to my apple? The apple surface was still waxy or slightly wet. Wax and water both prevent sugar adhesion. Remove wax with a 5-second boiling water dip, then dry completely with a rough towel before dipping.
- Never refrigerate candy apples. Cold air and humidity cause the hard candy coating to absorb moisture and turn sticky. Store at room temperature, uncovered or loosely wrapped, and eat within 1 to 2 days for the best texture.
- If the syrup thickens too much while dipping, return the pan to low heat for 20 to 30 seconds to loosen it. Do not add water.
- To make candy apples without corn syrup: substitute with 1 teaspoon of white vinegar or fresh lemon juice. This prevents sugar crystallization the same way corn syrup does.
- For Halloween candy apples: swap red gel coloring for black, deep purple, or forest green to get a spooky, dramatic finish. Black food coloring works best with extra-black gel, not regular black.
- Best day to make candy apples: a cool, dry, low-humidity day. On humid days, the coating will stay tacky even after cooling completely. Avoid making these on rainy days or in a steamy kitchen.
- Apple variety matters: Granny Smith gives a tart-sweet contrast that cuts through the sugar coating. Fuji and Honeycrisp are sweeter and equally firm. Avoid soft varieties like McIntosh or Red Delicious — they go mushy under the hot sugar.
Nutrition
- Serving Size: 1 candy apple
- Calories: 271
- Sugar: 65
- Sodium: 3
- Fat: 1
- Saturated Fat: 0
- Unsaturated Fat: 1
- Trans Fat: 0
- Carbohydrates: 71
- Fiber: 4
- Protein: 1
- Cholesterol: 0
Keywords: candy apple recipe, homemade candy apples, easy candy apple recipe, Halloween candy apples, candy apple without corn syrup, hard crack candy apples, glossy candy apples, candy apples from scratch, fall candy apple recipe, carnival candy apples, how to make candy apples, candy apple tips, sticky candy apple fix, best apples for candy apples