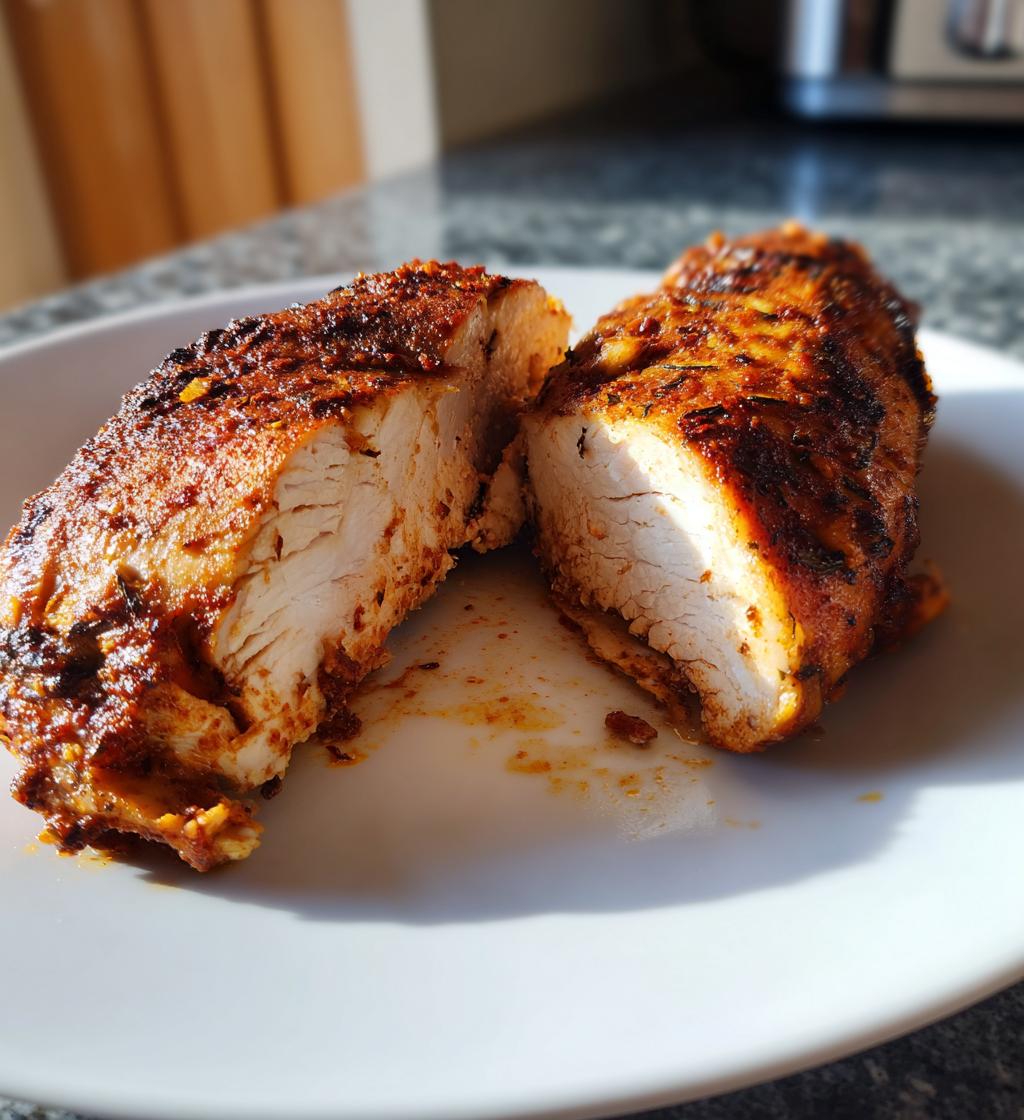
Oh, baked chicken breast! This simple dish is a go-to for so many reasons, and trust me, it’s one of my absolute favorites. Not only is it incredibly easy to prepare, but it’s also a healthy option that fits perfectly into any meal plan. The best part? You can have it on the table in just 35 minutes, making it perfect for busy weeknights.
When I think of baked chicken breast, I picture juicy, flavorful pieces of chicken that are just bursting with goodness. It’s a blank canvas for flavors, and you can dress it up however you like! Plus, it’s low in fat and high in protein, which makes it a fantastic choice for anyone looking to eat healthier without sacrificing taste. Seriously, what more could you ask for?
So, whether you’re cooking for yourself, your family, or throwing together a meal for friends, this baked chicken breast recipe is sure to impress. Let’s dive into the ingredients and get started on this delicious journey!
Ingredients List
Gathering the right ingredients is key to making the perfect baked chicken breast. Here’s what you’ll need:
- 4 boneless, skinless chicken breasts: Make sure they’re fresh for the best flavor and texture.
- 2 tablespoons olive oil: This adds a lovely richness and helps the seasonings stick.
- 1 teaspoon garlic powder: A must for that savory kick!
- 1 teaspoon onion powder: It complements the garlic beautifully.
- 1 teaspoon paprika: This gives your chicken a gorgeous color and a hint of smokiness.
- Salt to taste: Don’t skimp on this! It brings out all the flavors.
- Pepper to taste: Freshly ground is best for a bit of heat.
That’s it! Simple, right? These ingredients come together to create a meal that’s not just healthy but also incredibly satisfying. Trust me, once you have everything prepped, you’re just a few steps away from deliciousness!
How to Prepare Baked Chicken Breast
Now that we have all our ingredients ready, let’s roll up our sleeves and dive into the step-by-step process of making the perfect baked chicken breast! I promise, once you get the hang of this, it’ll become second nature.
Preheat the Oven
First things first, you’ll want to preheat your oven to 400°F (200°C). This step is super important because starting with a hot oven helps the chicken cook evenly and keeps it juicy. You want that nice, golden brown color and that delicious flavor! So while you’re prepping the chicken, let that oven get nice and toasty.
Prepare the Chicken
Next, take your boneless, skinless chicken breasts and pat them dry with a paper towel. This is a little trick I learned that helps the chicken get a nice sear and prevents it from steaming in the oven. You want to remove as much moisture as possible. Once they’re dry, drizzle about 2 tablespoons of olive oil over each chicken breast. Don’t be shy! Rub the oil in gently, making sure each piece is coated. This not only adds flavor but also helps the seasonings stick beautifully.
Season the Chicken
Now comes the fun part—seasoning! Sprinkle 1 teaspoon each of garlic powder, onion powder, and paprika evenly over both sides of the chicken. I like to use my hands for this, just to make sure every bit gets coated. And don’t forget to add salt and pepper to taste! You want to season generously; it makes all the difference in flavor. If you’re feeling adventurous, throw in some fresh herbs or a squeeze of lemon juice for an extra zing!
Bake the Chicken
Once your chicken is seasoned to perfection, it’s time to place them in a baking dish. Lay them out in a single layer, making sure they’re not overcrowded. Pop the dish in the preheated oven and bake for about 20-25 minutes. Now, here’s a little tip: check for doneness by using a meat thermometer. You’re looking for an internal temperature of 165°F (75°C). If you don’t have a thermometer, you can cut into the thickest part of the chicken; the juices should run clear, not pink. You want it perfectly cooked, not overdone!
Rest the Chicken
Once the chicken is done baking, resist the urge to dive in right away! Let it rest for about 5 minutes before slicing. This resting period is crucial—it allows the juices to redistribute, making your chicken extra juicy and tender. Trust me, it’s worth the wait! When you finally slice into it, you’ll be rewarded with that perfectly moist and flavorful chicken you deserve!
Nutritional Information
Now, let’s talk about the numbers! Knowing the nutritional values of your baked chicken breast can help you feel even better about this delicious dish. Here’s a typical breakdown per serving (1 chicken breast):
- Calories: 165
- Fat: 4 g
- Saturated Fat: 1 g
- Unsaturated Fat: 3 g
- Trans Fat: 0 g
- Cholesterol: 75 mg
- Sodium: 75 mg
- Carbohydrates: 0 g
- Fiber: 0 g
- Sugar: 0 g
- Protein: 31 g
Keep in mind that these values are estimates and can vary based on the specific ingredients you use and how you prepare the dish. But one thing’s for sure—this baked chicken breast is a fantastic source of lean protein and a wonderful addition to any healthy meal plan!
Tips for Success
Alright, friends, let’s make sure your baked chicken breast turns out perfectly every single time! Here are my top tips to avoid any pitfalls and achieve that juicy, flavorful result we all crave.
Don’t Skip the Drying Step
One of the biggest mistakes I see is skipping the drying process. Patting the chicken dry with a paper towel is essential! If there’s too much moisture, your chicken will steam instead of bake, and you won’t get that lovely sear and flavor. Trust me, a little extra effort goes a long way!
Be Generous with Seasoning
When it comes to seasoning, don’t hold back! I like to think of seasoning as a love language for chicken. Make sure you coat every inch of your chicken breasts. If you’re feeling adventurous, try adding your favorite spices or even a sprinkle of lemon zest for that extra pop. Just remember: bland chicken is a no-go!
Use a Meat Thermometer
If you want to ensure perfectly cooked chicken every time, a meat thermometer is your best friend. It takes the guesswork out of cooking! Aim for that magic number of 165°F (75°C). If you don’t have one, don’t worry! Just cut into the thickest part of the chicken to check if the juices run clear. If they do, you’re golden!
Let It Rest
Ah, the resting period. I know it’s hard to wait, but this step is crucial! Letting the chicken rest for about 5 minutes before slicing allows the juices to redistribute, making every bite moist and tender. You’ll thank yourself later when you sink your teeth into that juicy goodness!
Experiment with Marinades
If you want to take flavor to a whole new level, try marinating your chicken breasts for a few hours (or even overnight) before baking. You can use a simple mix of olive oil, lemon juice, and herbs, or get creative with your favorite sauces. Just remember to adjust the salt and seasoning afterward, as marinating can enhance those flavors!
With these tips in your back pocket, you’re all set to create the most amazing baked chicken breast. Happy cooking, and get ready for some delicious meals ahead!
Why You’ll Love This Recipe
This baked chicken breast recipe isn’t just about cooking; it’s about creating something special with minimal fuss. Here are a few reasons why you’ll absolutely love it:
- Quick to Prepare: With just 10 minutes of prep time and a total of 35 minutes from start to finish, you can have a delicious meal on the table in no time.
- Easy to Make: This recipe is straightforward, making it perfect for beginner cooks or anyone looking for a stress-free dinner option. You really can’t mess it up!
- Flavor Packed: The combination of spices like garlic powder, onion powder, and paprika delivers a burst of flavor that will have everyone asking for seconds.
- Healthy Choice: With low fat and high protein content, this dish fits perfectly into a balanced diet. It’s a guilt-free way to enjoy a hearty meal!
- Versatile: You can easily customize the seasonings or add marinades to suit your taste. It pairs beautifully with just about any side dish, making it a great fit for any occasion.
- Leftovers Made Easy: If you happen to have leftovers, they store well and can be used in salads, wraps, or sandwiches, making them a perfect meal prep option!
Trust me, once you give this recipe a try, it’s bound to become a regular in your dinner rotation. Enjoy the deliciousness!
Serving Suggestions
Now that you’ve got this scrumptious baked chicken breast ready, let’s talk about how to turn it into a complete meal! The beauty of this dish is its versatility—it pairs beautifully with so many sides. Here are some of my favorite serving suggestions to elevate your dinner experience:
- Roasted Vegetables: Toss a mix of your favorite seasonal veggies—like carrots, broccoli, and bell peppers—with olive oil, salt, and pepper. Roast them in the oven while your chicken bakes for a colorful and nutritious side.
- Creamy Mashed Potatoes: What goes better with chicken than a fluffy serving of mashed potatoes? Add a touch of garlic and butter for extra flavor. It’s the ultimate comfort food combo!
- Quinoa Salad: For a lighter option, whip up a refreshing quinoa salad with cucumbers, cherry tomatoes, parsley, and a squeeze of lemon. It’s super healthy and adds a nice crunch to your meal.
- Garlic Bread: If you’re in the mood for something a little indulgent, serve your chicken with warm, buttery garlic bread. It’s perfect for soaking up any delicious juices!
- Steamed Rice: A simple side of steamed rice—like jasmine or brown rice—works great to soak up all the flavors from your chicken. You can even sneak in some herbs or spices for added flair!
- Side Salad: A crisp side salad with mixed greens, avocado, and a tangy vinaigrette is an excellent way to add freshness to your plate. It balances the richness of the chicken perfectly.
Feel free to mix and match these suggestions based on what you have on hand or what you’re craving that day! The goal is to create a balanced meal that not only satisfies your taste buds but also looks beautiful on the plate. Enjoy your delicious baked chicken breast with any of these delightful sides for a complete and satisfying dinner!
Storage & Reheating Instructions
So, you’ve made this amazing baked chicken breast and have some leftovers—great news! Storing and reheating them properly is key to keeping that juicy flavor intact. Here’s how I do it:
First, let your chicken cool down to room temperature. Once it’s cooled, I like to slice it into bite-sized pieces for easier storage and reheating. Grab an airtight container and place the chicken inside. Make sure to seal it tightly to keep out any unwanted air or moisture. You can store your leftovers in the fridge for up to 3 days. You’ll want to label the container with the date, just to keep track!
When you’re ready to enjoy your chicken again, reheating it gently is the best approach. I recommend preheating your oven to 350°F (175°C) and placing the chicken in an oven-safe dish. To keep it moist, drizzle a little olive oil or chicken broth over the top. Cover the dish with aluminum foil to trap in moisture and prevent drying. Pop it in the oven for about 10-15 minutes, or until it’s warmed through.
If you’re in a hurry, you can also reheat the chicken in the microwave. Just place the sliced chicken on a microwave-safe plate, cover it with a damp paper towel (this helps keep it from drying out), and heat in short bursts of 30 seconds until it’s hot. Keep an eye on it so you don’t overdo it!
And there you have it—easy storage and reheating tips to make sure your baked chicken breast stays delicious and satisfying, even on the second day. Trust me, it’s worth the effort to keep enjoying those tasty leftovers!
Frequently Asked Questions
If you’re diving into the world of baked chicken breast for the first time, you might have a few questions. Don’t worry, I’ve got you covered! Here are some of the most common queries I hear, along with my answers to help you on your culinary journey.
Can I use bone-in chicken breasts for this recipe?
Absolutely! While this recipe is designed for boneless, skinless chicken breasts for quick cooking, you can definitely use bone-in pieces. Just keep in mind you’ll need to adjust the cooking time. Bone-in chicken typically takes a bit longer to cook, so aim for about 30-35 minutes or until the internal temperature reaches 165°F (75°C).
What can I do if I don’t have all the spices listed?
No problem at all! This baked chicken breast recipe is super versatile. If you’re missing a spice or two, feel free to get creative. You can use Italian seasoning, herbs de Provence, or even a dash of hot sauce for a spicy kick. Just remember to season generously, and you’ll still end up with delicious results!
Can I marinate the chicken before baking?
How do I know when the chicken is done baking?
The best way to check for doneness is to use a meat thermometer. You’re looking for an internal temperature of 165°F (75°C). If you don’t have one handy, you can cut into the thickest part of the chicken—if the juices run clear and there’s no pink, you’re good to go! Just be careful not to overcook it; we want that juicy goodness!
What’s the best way to store leftovers?
Storing leftovers is super easy! Just let your baked chicken cool to room temperature before slicing it into pieces. Place it in an airtight container and pop it in the fridge, where it’ll stay fresh for up to 3 days. If you want to keep it longer, you can also freeze it for up to 3 months. Just make sure to label your container so you don’t forget about it!
With these FAQs answered, you’re all set to tackle baked chicken breast like a pro! Enjoy the cooking process and the delicious results!
Print
Baked Chicken Breast: 5 Irresistibly Juicy Tips to Savor
- Total Time: 35 minutes
- Yield: 4 servings 1x
- Diet: Low Fat
Description
Baked chicken breast is a simple and healthy dish that is easy to prepare and packed with flavor.
Ingredients
- 4 boneless, skinless chicken breasts
- 2 tablespoons olive oil
- 1 teaspoon garlic powder
- 1 teaspoon onion powder
- 1 teaspoon paprika
- Salt to taste
- Pepper to taste
Instructions
- Preheat your oven to 400°F (200°C).
- Pat the chicken breasts dry with a paper towel.
- Rub olive oil over each chicken breast.
- Sprinkle garlic powder, onion powder, paprika, salt, and pepper evenly on both sides of the chicken.
- Place the chicken breasts in a baking dish.
- Bake for 20-25 minutes or until the internal temperature reaches 165°F (75°C).
- Remove from the oven and let rest for 5 minutes before slicing.
Notes
- You can marinate the chicken for extra flavor.
- Serve with your choice of vegetables or salad.
- Store leftovers in an airtight container in the fridge for up to 3 days.
- Prep Time: 10 minutes
- Cook Time: 25 minutes
- Category: Main Dish
- Method: Baking
- Cuisine: American
Nutrition
- Serving Size: 1 chicken breast
- Calories: 165
- Sugar: 0 g
- Sodium: 75 mg
- Fat: 4 g
- Saturated Fat: 1 g
- Unsaturated Fat: 3 g
- Trans Fat: 0 g
- Carbohydrates: 0 g
- Fiber: 0 g
- Protein: 31 g
- Cholesterol: 75 mg
Keywords: baked chicken breast, healthy chicken recipe, easy chicken dinner