Deviled Eggs: 6 Foolproof Steps for Perfectly Creamy Filling
Deviled eggs are a classic appetizer that never goes out of style. These creamy, flavorful bites are perfect for any occasion, from parties to picnics. Once you master this deviled eggs recipe, you’ll impress your family and friends every time.
What is Deviled Eggs?
Deviled eggs are hard-boiled eggs that have been peeled, cut in half, and filled with a rich, creamy mixture made from the yolks. This classic dish often includes ingredients like mayonnaise, mustard, and spices, making them a delicious addition to any meal or gathering.
Why You Will Love This Recipe
- Easy to Make: This deviled eggs recipe is straightforward, even for beginners.
- Customizable: You can add various ingredients to suit your taste.
- Perfect for Any Occasion: Whether it’s a holiday, party, or picnic, deviled eggs fit right in.
- Healthy Snack: They are high in protein and low in carbs, making them a nutritious choice.
- Visually Appealing: Beautifully garnished deviled eggs can enhance your serving table.
Ingredients You Need
- 6 large eggs
- ¼ cup mayonnaise
- 1 teaspoon Dijon mustard
- 1 teaspoon white vinegar
- Salt and pepper to taste
- Paprika for garnish
- Fresh chives or dill for garnish (optional)
How to Make Deviled Eggs Step by Step
- Start by boiling the eggs. Place the eggs in a saucepan, cover them with cold water, and bring to a boil.
- Once boiling, cover the saucepan and remove it from heat. Let the eggs sit for 12 minutes.
- After 12 minutes, transfer the eggs to an ice bath to cool for 5 minutes. This makes peeling easier.
- Peel the cooled eggs and slice them in half lengthwise. Remove the yolks and place them in a mixing bowl.
- Add mayonnaise, Dijon mustard, vinegar, salt, and pepper to the yolks. Mix until creamy and smooth.
- Using a spoon or piping bag, fill the egg white halves with the yolk mixture. Sprinkle with paprika and garnish with herbs if desired.
Expert Tips for Best Results
- Use older eggs for easier peeling.
- Don’t skip the ice bath; it prevents a gray ring around the yolk.
- Experiment with spices like cayenne pepper for a kick.
- For a creamier filling, add a touch of sour cream.
- Make them ahead of time and store in the fridge for up to two days.
How to Serve and Store
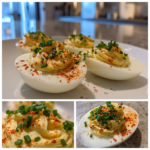
Serve deviled eggs chilled on a platter, garnished with paprika or herbs for an attractive presentation. Store any leftovers in an airtight container in the refrigerator for up to 48 hours. For best results, keep the filling and egg whites separate until ready to serve.
Frequently Asked Questions
Can I make deviled eggs a day in advance?
Yes, you can prepare deviled eggs a day ahead. Store the filling and egg whites separately to keep them fresh.
What can I add to deviled eggs for extra flavor?
Consider adding ingredients like bacon bits, avocado, or hot sauce for a flavor twist.
Why do my deviled eggs have a green ring around the yolk?
A green ring appears when eggs are overcooked. To avoid this, follow the boiling and cooling times carefully.
How do I prevent deviled eggs from sticking to the plate?
Use a non-stick plate or lightly grease the serving dish to help prevent sticking.
Can I use Greek yogurt instead of mayonnaise?
Yes, Greek yogurt is a healthy alternative and adds a tangy flavor to the filling.
In conclusion, deviled eggs are an easy and delicious appetizer that you can master with just a few simple steps. With this deviled eggs recipe, you’ll create a creamy filling that’s sure to impress. Try it today and elevate your next gathering with this timeless dish!
Print